

Relief Restorations
Water Damage in Rental Properties: Winnipeg Guide
Water damage in Winnipeg rental properties demands swift action, clear communication, and professional expertise. Property managers must balance tenant safety, legal obligations, and insurance claims while preventing secondary damage like mould growth. This guide covers immediate response steps, Manitoba tenancy law, seasonal risks, and prevention strategies to help you protect your property.
Introduction: Why Water Damage in Rentals Demands a Clear Response
Water damage in rental units creates immediate challenges: tenants need a safe home, the building requires protection from secondary damage, and you must comply with Manitoba residential tenancy law. The stakes are high. Mould can begin growing within 24–48 hours of water exposure, and delays in restoration cost thousands in additional repairs.
Property managers occupying the middle ground between tenants and building owners need a clear, documented plan. A swift response protects the structure, maintains tenant relations, reduces insurance claims disputes, and demonstrates your compliance with legal duties.
This guide walks you through the immediate steps after water damage occurs, your legal responsibilities under Manitoba law, seasonal Winnipeg risks, mould prevention, and long-term strategies to reduce future incidents. Whether you manage a single duplex or a portfolio of buildings, these principles apply.
Immediate Response: First Steps When Water Damage Occurs
The first few hours after water damage is discovered are critical. Your response sets the tone for recovery and protects your legal standing.
Start by ensuring tenant safety. If water involves electrical hazards, contamination from sewage, or structural damage, advise tenants to vacate immediately and contact emergency services if needed. Do not ask tenants to clean up black water (sewage) or work in unsafe conditions.
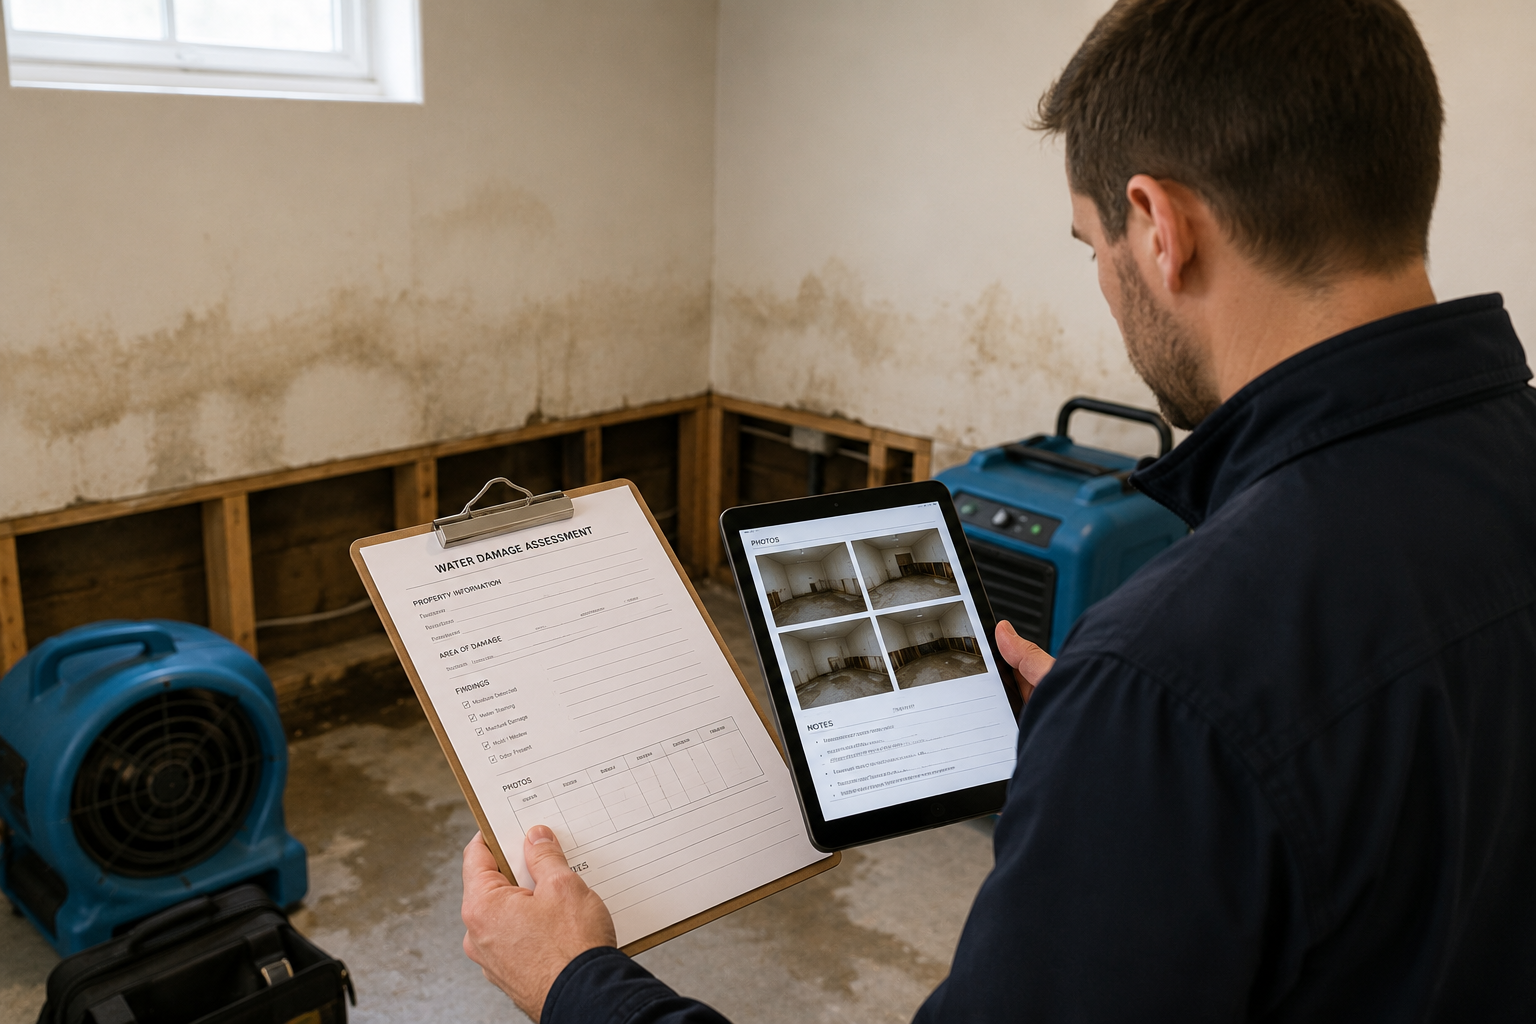
Next, document the damage with photos and video before any cleanup or removal begins. This record is essential for your insurance adjuster and protects you if disputes arise later. Photograph the water source, affected areas, damaged materials, and the extent of saturation.
Call your insurance provider as soon as you identify the damage. Report the incident, describe what you know about the cause, and ask about your deductible and coverage. Do not wait for the adjuster to arrive before contacting a restoration company; insurers expect property managers to act promptly to prevent further damage.
Contact a certified water damage restoration company like Relief Restorations immediately; 24/7 emergency line: (204) 400-8426. A professional assessment determines the extent of the damage, identifies the water source, and outlines the restoration plan. The restoration team will begin drying the space, remove saturated materials if needed, and monitor for secondary damage.
Notify tenants in writing within 24 hours. Explain what happened, what you are doing, and when you expect repairs to be complete. Provide your emergency contact number and clarify whether the unit remains habitable or if tenants need alternative accommodation.
Identify the water source to prevent recurrence. A burst pipe, roof leak, sewage backup, or exterior flooding each requires different prevention strategies. Document this in your records and share findings with the restoration team to guide their assessment.
Understanding Water Damage Categories and Liability
Not all water damage is the same. The source of the water determines the restoration approach, contamination risk, and liability allocation. Understanding these categories helps you communicate accurately with adjusters and ensures the restoration team uses appropriate containment and remediation methods.
Category 1 (clean water) originates from sanitary sources: burst pipes, roof leaks, condensation, and overflowing sinks or bathtubs. This water poses the lowest contamination risk and is typically covered by standard property insurance.
Category 2 (grey water) comes from dishwashers, washing machines, toilet overflows (if caught early), and sump pump backups. It contains some contaminants and requires careful handling to avoid mould and odour problems. Restoration takes longer and may require professional cleaning and deodorization.
Category 3 (black water) is the most hazardous: sewage backups, contaminated floodwater, and water from outside the building envelope that has been exposed to soil, chemicals, or biological material. Category 3 damage requires specialized remediation, professional containment systems, and removal of affected materials. Tenants should vacate during cleanup.
Your property insurance typically covers accidental damage from burst pipes or roof leaks (Category 1). If a tenant's negligence caused the damage (e.g., leaving a tap running), their liability insurance may apply. If the damage stems from a building defect you failed to maintain, the insurer may question your claim.
Document the source and cause clearly for your adjuster. Provide photos, witness statements if available, and any maintenance records that show you kept the property in good repair. This clarity speeds claim processing and may affect cost allocation if multiple parties share responsibility.
Property Manager Responsibilities Under Manitoba Tenancy Law
Manitoba's Residential Tenancies Act imposes specific legal duties on landlords and property managers. Water damage intersects with several of these obligations, and understanding them protects you from disputes and tenant complaints.
You must maintain the rental unit in a state of good repair, including the roof, exterior walls, plumbing, heating system, and structural elements. This is a non-negotiable duty. If the roof leaks or a pipe bursts and you delay repairs, you have breached this obligation.
If water damage makes the unit uninhabitable (no heat, standing water, structural damage, or mould growth that creates a health hazard) you may be required to provide alternative accommodation at no cost to the tenant, offer a rent reduction, or allow the tenant to break the lease. "Uninhabitable" is defined by the Act and by case law; it is a higher bar than "inconvenient," but water damage often crosses it.
Tenants have the right to repair and deduct if you fail to address water damage or resulting mould within a reasonable time. Reasonable time is typically 7–14 days depending on the severity and the season. If you do not act, a tenant may hire a contractor, pay out of pocket, and deduct the cost from rent. This is a costly way to learn the lesson.
Document all communications with tenants about the damage, your response plan, and repair timelines. Use email or written notices so you have a clear record. Include dates, actions taken, and expected completion. This documentation protects you if a tenant later claims you ignored the problem.
Consult a legal advisor or your property management association if disputes arise over responsibility, rent abatement, or habitability. This guide does not provide legal advice, and tenant relations can escalate quickly. Professional legal counsel is worth the investment.
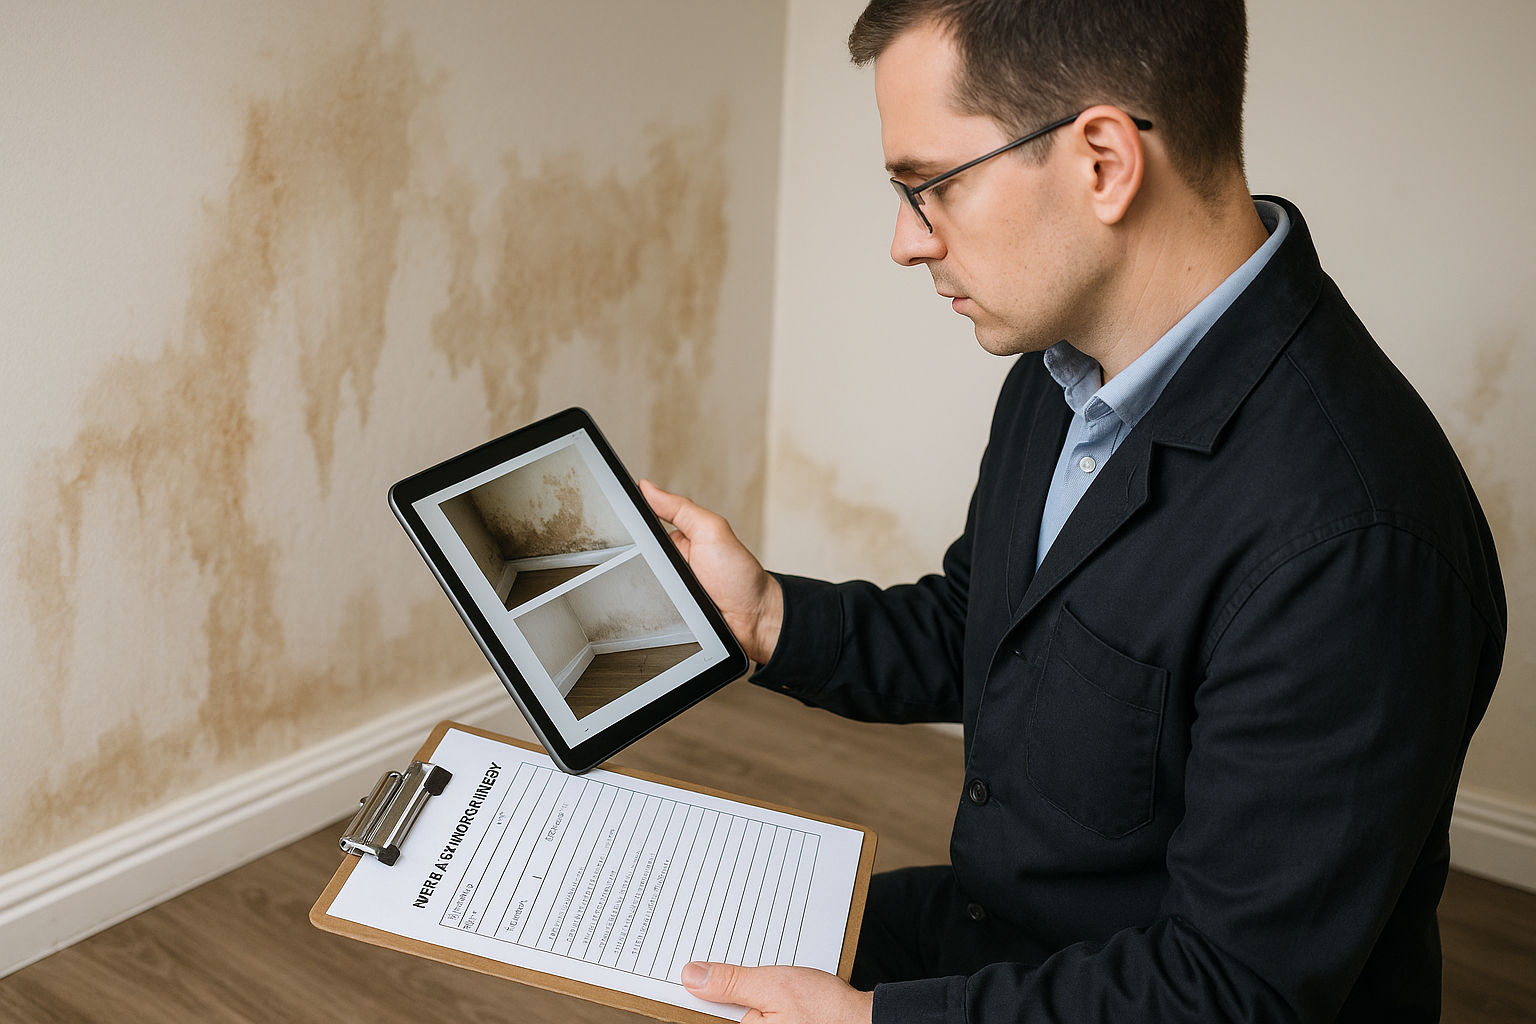
Mould Prevention and Secondary Damage Control
Mould is the most costly secondary problem after water damage. A burst pipe that soaks drywall and flooring can lead to extensive mould remediation if the space is not dried quickly and thoroughly.
Mould thrives in wet, poorly ventilated spaces. It can begin colonizing materials within 24–48 hours of water exposure. By day 3 or 4, if the space is still damp and warm, visible mould may appear. Prevention requires rapid drying and continuous monitoring.
Professional restoration teams use commercial-grade equipment: dehumidifiers rated for large spaces, high-velocity air movers to keep air moving through wet materials, and moisture metres to track drying progress. This equipment operates 24/7 during the drying phase, often for 5–10 days depending on the extent of saturation.
Affected materials must be assessed carefully. Drywall that has absorbed water above the 30-centimetre mark and remains wet for more than 48 hours typically needs removal; the same applies to insulation and flooring if saturation is deep or prolonged. Wet carpet is almost always removed because the backing and padding trap moisture.
After the space reaches normal moisture levels (measured with a moisture metre), monitoring continues for at least 30 days. The restoration team should schedule follow-up visits to ensure no hidden pockets of moisture remain and no mould has emerged.
If mould is visible or suspected after drying, contact a certified mould inspector for testing and professional remediation guidance. Do not assume the space is safe; mould spores and mycotoxins can cause health problems, especially for tenants with respiratory conditions or allergies.
Inform tenants of the drying process and mould prevention steps. Encourage them to report any visible growth, musty odours, or dampness immediately. Early detection prevents remediation from becoming a major (and expensive) secondary project.
Seasonal Water Damage Risks in Winnipeg
Winnipeg's climate creates predictable seasonal water damage patterns. Property managers who plan preventive maintenance around these windows reduce the frequency and severity of incidents.
Spring is the highest-risk season. Snowmelt and heavy April rains increase basement flooding risk. Gutters and downspouts clogged with winter debris direct water toward the foundation. Roof leaks emerge as snow thaws and ice dams melt. Before April, inspect the roof, gutters, downspouts, and foundation drainage. Ensure downspouts extend at least 2 metres away from the building; water pooling near the foundation increases hydrostatic pressure on basement walls.
Winter brings frozen-pipe risk. When outdoor temperatures drop sharply, pipes in unheated basements, crawlspaces, or exterior walls can freeze and burst. Insulate exposed pipes and install heat tape on high-risk lines. Advise tenants in unheated areas to let a tap drip slowly during extreme cold; moving water resists freezing.
Ice damming is a winter-specific Winnipeg problem. Snow accumulates on the roof; warmer indoor air melts the bottom layer, and the meltwater refreezes at the colder eaves, forming a dam. Water backs up under the shingles and leaks into the attic and walls. Poor attic insulation and inadequate ventilation increase risk. Ensure attic insulation meets current codes and that soffit vents are not blocked. In severe cases, heated cables or roof rakes may be needed.
Summer storms can cause roof damage and water intrusion. High winds lift shingles; heavy rain exploits weaknesses. Trim overhanging branches that can break and puncture the roof, and ensure gutters are clear so water drains freely.
Schedule annual inspections in autumn. Address vulnerabilities before winter and spring. This proactive approach costs far less than emergency restoration.
Working with Restoration Professionals and Adjusters
Certified restoration companies and insurance adjusters are your key partners in managing water damage claims efficiently and fairly.
Choose an IICRC-certified (Institute of Inspection, Cleaning and Restoration Certification) water damage restoration company. IICRC certification ensures the team follows industry-standard protocols for water extraction, drying, and documentation. Relief Restorations is IICRC certified and has experience working with Winnipeg property managers and adjusters.
Provide your adjuster with the restoration company's scope of work and timeline. A clear scope (what will be removed, dried, cleaned, and replaced) speeds claim processing and prevents surprises. Adjusters appreciate detailed invoices with line-item descriptions and before/after photos.
Request detailed invoices and before/after photos from the restoration team for your records. These documents are essential if you need to defend the claim or if disputes arise about the extent of damage or the necessity of removal.
If the restoration company identifies hidden damage during the work (mould in walls, structural damage, asbestos in older buildings) report it to your adjuster immediately. These discoveries may expand the claim and affect coverage.
Understand your deductible and coverage limits before restoration begins. If your deductible is $2,500 and the estimate is $4,000, your out-of-pocket cost is $2,500 (if the claim is approved). Know this upfront to avoid surprises.
Do not delay restoration to wait for the adjuster's site visit. Water damage worsens daily, and secondary damage (mould, structural weakness) compounds the cost. Insurers expect property managers to act promptly. The adjuster will review your restoration company's report and photos to assess the claim; they do not need to be present for drying to begin.
Tenant Communication and Dispute Prevention
Clear, timely communication with tenants reduces conflict and demonstrates your commitment to resolving the problem. It also protects you legally if disputes arise later.
Notify tenants in writing within 24 hours of discovering water damage. Explain what happened, what you are doing, and the expected timeline for repairs. If the unit remains habitable, say so. If tenants must vacate temporarily, be clear about alternative accommodation or rent abatement.
Provide daily updates if the unit is uninhabitable or if restoration takes longer than a few days. Tenants are anxious; silence breeds frustration and distrust. A brief email saying "drying is on schedule, air movers running 24/7, expect to finish by Friday" is reassuring.
Explain what tenants should and should not do. Do not ask them to move wet furniture to other rooms (it spreads water and mould spores). Do not allow DIY drying attempts; commercial equipment is essential. Do encourage them to open windows if weather permits and to report any new water intrusion or musty odours.
If tenants must vacate temporarily, offer reasonable alternative accommodation or clarify rent abatement terms in writing. If the unit is uninhabitable for 5 days and rent is $1,500/month, a fair reduction is roughly $250 for that period. Document this in writing and honour the agreement.
Keep copies of all written communications and tenant responses. Email is ideal because it creates a time-stamped record. If a tenant later claims you ignored the damage or failed to act, these emails prove otherwise.
If a tenant claims personal property damage (wet furniture, electronics, clothing), direct them to their renters' insurance. Your property insurance covers the building and its permanent fixtures, not tenant belongings. Explain this clearly and in writing so tenants do not expect you to reimburse them for personal items.
Prevention Strategies and Long-Term Property Management
Proactive maintenance and tenant education reduce the frequency and severity of water damage incidents. A few hundred dollars spent on prevention saves tens of thousands in restoration.
Conduct annual inspections before high-risk seasons. Walk the roof in autumn and spring; check for cracked or missing shingles, damaged flashing, and debris buildup. Inspect gutters and downspouts; clean out leaves and grit. Check foundation walls for cracks or seepage. In the basement, look for active leaks, efflorescence (white mineral deposits indicating moisture), and mould.
Maintain clear gutters and downspouts year-round. In Winnipeg, gutters fill with leaves in fall and ice dams can form in winter. Clear them before these seasons. Ensure downspouts extend at least 2 metres away from the foundation; water pooling against the building increases hydrostatic pressure and promotes basement leaks.
Insulate and heat basement pipes in older buildings. Winnipeg winters are harsh. Pipes in unheated crawlspaces or exterior walls are vulnerable. Wrap pipes with foam insulation; consider heat tape for high-risk areas. For rental properties in older neighbourhoods, a basement inspection by a plumber may reveal vulnerabilities worth addressing before winter.
Test sump pumps and backwater valves annually. A sump pump that has not been tested in 12 months may fail during spring snowmelt. Replace backup batteries in sump pump alarms yearly. Ensure the discharge line extends away from the foundation.
Educate tenants about reporting leaks, drips, water stains, or musty odours immediately. A small drip under a sink, caught early, takes 30 minutes to fix. If ignored for months, it saturates the cabinet and subfloor. Provide tenants with a clear emergency contact procedure and your 24/7 line for water emergencies.
Consider installing water detection sensors in high-risk areas: basements, near water heaters, under sinks, and around toilets. These sensors alert you (via app or alarm) if moisture is detected, allowing rapid response before damage spreads.
Summary: Key Takeaways for Property Managers
Water damage in rental properties is stressful, but a structured approach minimizes cost and protects your legal standing.
Respond immediately. Within hours, ensure tenant safety, document damage with photos and video, contact your insurance provider, and call a certified restoration company. Delays invite mould growth and secondary damage.
Understand your legal obligations. Manitoba's Residential Tenancies Act requires you to maintain the property in good repair and ensure it remains habitable. Slow response to water damage can trigger tenant repair-and-deduct rights or claims for lost quiet enjoyment.
Prioritize rapid drying to prevent mould. Mould grows within 24–48 hours and is expensive to remediate. Use certified professionals with commercial-grade equipment.
Communicate clearly and frequently with tenants. Explain what happened, what you are doing, and when repairs will be complete. Keep detailed records of all communications.
Plan preventive maintenance around Winnipeg's seasonal risks. Spring flooding, winter frozen pipes, and ice damming are predictable. Inspection and maintenance before these seasons reduce incidents.
Partner with IICRC-certified restoration companies and experienced insurance adjusters. They speed claims processing and ensure industry-standard work.
Next Steps: Contact Relief Restorations
When water damage strikes a rental property, professional assessment and restoration are essential. Relief Restorations is available 24/7 to help Winnipeg property managers respond quickly and effectively.
Call Relief Restorations immediately for water damage emergencies: (204) 400-8426 (24/7) or toll-free (833) 367-7354. Relief crews are lead by IICRC certified technicians and we're fully insured; we work directly with adjusters and provide detailed documentation for insurance claims.
For detailed information on water damage restoration, mould remediation, and other property damage services, explore Relief's service pages or contact us for a consultation.
Early professional intervention makes the difference between a manageable incident and a costly, lengthy remediation project.
Water Damage Response Checklist for Property Managers
When water damage strikes a rental property, having a documented action plan helps you respond quickly and protect both the tenant and your investment. Use this checklist to stay organized during the critical first hours and days.
Immediate Actions (First Hour)
☐ Ensure tenant safety, evacuate if necessary (e.g., electrical hazard, sewage backup) ☐ Stop the water source if safe to do so (shut off main valve, close windows, move furniture) ☐ Contact Relief Restorations at (204) 400-8426 for emergency response ☐ Document the damage with photos and video from multiple angles ☐ Note the date, time, and cause of the damage ☐ Notify your insurance provider and request an adjuster assignment
Short-Term Actions (First 24–48 Hours)
☐ Confirm the restoration contractor's arrival and scope of work ☐ Provide tenant with a written summary of next steps and timeline ☐ Arrange temporary accommodation if the unit is uninhabitable ☐ Preserve all damaged materials for adjuster inspection (do not discard) ☐ Request a moisture assessment and mould-risk evaluation from the restoration team ☐ Review your tenancy agreement regarding tenant responsibilities and deductibles
Ongoing Actions (Days 3–7)
☐ Monitor drying progress and humidity levels with the restoration team ☐ Coordinate with the insurance adjuster on coverage and claim status ☐ Keep written records of all communications and expenses ☐ Schedule any required mould inspection or remediation if water damage was extensive ☐ Plan repairs and restoration timeline with the contractor ☐ Update tenant on expected move-back date
Before Return to Occupancy
☐ Confirm all drying and restoration work is complete ☐ Request a final inspection report from the restoration contractor ☐ Verify mould clearance (if applicable) with lab results or professional assessment ☐ Conduct a walk-through with the tenant to document the restored condition ☐ Confirm utilities are safe and all systems are functioning ☐ Finalize insurance claim and settlement documentation
Having this checklist on hand (whether printed or digital) reduces the risk of missed steps and helps you maintain clear communication with tenants, contractors, and adjusters. Relief Restorations can guide you through each phase and provide the professional assessment and documentation your insurance claim requires.
Contact Relief at (204) 400-8426 (24/7) or toll-free at (833) 367-7354 to discuss your property's specific risks and restoration readiness. We serve Winnipeg and surrounding Manitoba communities.
Need professional help?
Our certified team is available 24/7 for emergency response and free consultations across Winnipeg and Manitoba.
Get Restoration Tips & Guides
Join Manitoba homeowners and property managers who receive our seasonal maintenance tips, restoration guides, and industry updates. No spam - unsubscribe anytime.